
21. Making Radio Photos
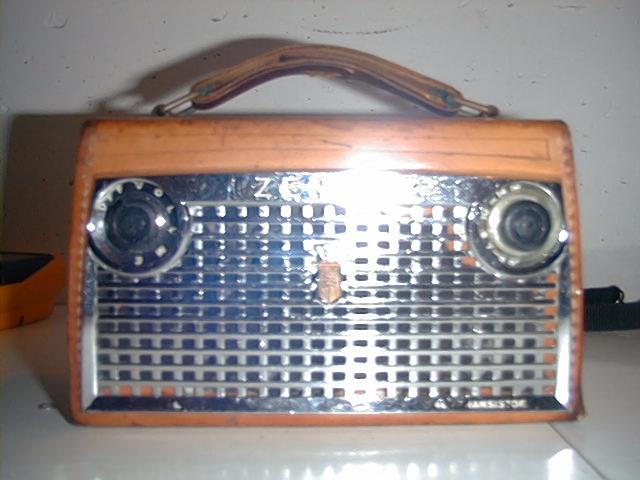
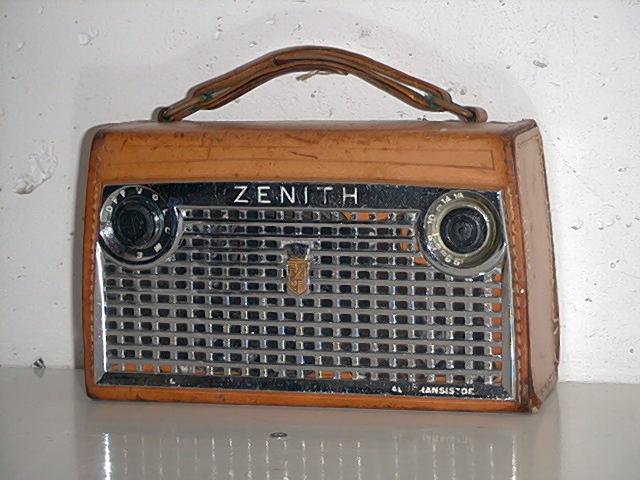
If your radio photos often look like the one on the left, but you would prefer them to come out like the one on the right, this document may be of some help for you.
In no way I would consider myself to be an expert in shooting radios and I know that many people already make much better pictures than I do.
But I don't have their skills nor their equipment, and I know many other people don't have it, too.
The article just contains a few hints for people who are beginners, like me.
The article focuses around a few themes:
Equipment;
Resolution and Sizing;
Focal length;
Position and Reflections;
Background;
Details.


Until 2000 I used a chemical camera (left) and scanned the photos after printing.
The process is cumbersome and often the pictures came out unsatisfactorily and had to be redone.
Now I have a digital camera (right) so I see the picture immediately and can reshoot if I don't like it.
The colors of the photos are brighter, and all pictures come out in the same resolution (640x480 pixels).
It is also extremely easy to get the picture in digital format.
I specifically bought the Agfa ePhoto1680 for radio work and made the beforehand requirement that the camera should have an optical zoom.
Virtually all digital cameras have autofocus and a built-in flash, which are extremely useful for shooting radios.
When the Agfa was stolen I bought myself a Canon A40 and when that one broke down I bought a Canon A60.
The photos are stored most often in .jpg or .gif format and included in an HTML document using the img tag, as in <img src=blabla.jpg>.
You often want some control over how big the picture will appear in the page and many people use resolution to achieve this control.
This picture, for example, appears big because it is a 640x480 pixel image:
 In contrast, the picture on the right appears smaller because it is only a 160x120 pixel image.
The file sizes of these pictures are 54kB and 7kB, respectively.
However, controlling image appearance using resolution is a poor way to do it.
In contrast, the picture on the right appears smaller because it is only a 160x120 pixel image.
The file sizes of these pictures are 54kB and 7kB, respectively.
However, controlling image appearance using resolution is a poor way to do it.
There is a variety of ways in which your audience can "consume" your HTML pages.
They can be viewed in different screen resolutions, in full-screen or windows, or printed.
They can be viewed now or after ten years.
And, if you tune the image resolution until it appears the way you want it in your screen using your browser, it may look completely different when the page is viewed by somebody else.
Try resizing your window and observe how the above pictures will appear smaller or will no longer fit in.
For this reason I prefer to size the page using the width=xx% addition to the img tag.
Left and right of these pictures are the same ones in 640x480 and 160x120 pixels, but with additional tags that define the width of both pictures to be one third of the window width.
On your screen you may hardly see that the left picture is more detailed, but if you print this page you'll see that the left one comes out with more detail.
I always control the size of pictures on a page with the width=xx% tag.
Picture resolution is a compromise between file size (which means, download time!) and quality;
most pictures in Gerard's Radio Corner are about 640x480 pixels.
Since the summer of 2005 I have decided to use the more detailed 1024x768 pixels format, because most people have wide band connections so the compromise may shift a bit towards quality.
You want to show the radio as clear and detailed as possible, hence the radio should fill up as much of the picture area as possible.
A standard objective (often referred to as 40mm or 50mm objectives) has too wide an opening angle to shoot a radio full screen.
You would have to approach the radio too close which gives a very unnatural perspective as shown on the right.

The left picture was taken with a tele-objective and has a much better perspective of the same radio.
You should use at least 80mm or 100mm of focal length for photographing any rectangular object.
Perspective distortion can be avoided with short lenses, by taking the photo straight from ahead, so that the front of the radio will appear fully symmetric in the image.
The camera should ideally have an optical zoom option, because only optical zooming does not decrease resolution.
If your camera does not feature optical zoom, shoot the radio so that it appears only in the center of the image and crop it; this will decrease resolution.
Note: the quoted 40mm, 50mm, 80mm, and 100mm are the normal and tele ranges of objectives for chemical cameras with 24x36mm film.
Digital cameras have a smaller image area and for them 8mm or 9mm is the normal objective, and 25mm is a tele-objective.
For two reasons I most often shoot a radio slightly from a
side postion, not from straight ahead.
First, I think the photo is more lively and shows more of the radio when taken under an angle.
Second, with a shiny front it is difficult to avoid reflections in the picture.
The examples left and right show the radio from straight ahead, and the right one is taken with short focus.

You see that unlike the earlier short focus photo, there isn't much perspective distortion, however, the perspective is already very dull on both photos.
Moreover, the flash causes bad reflections on the metal grille and on the right they are even very bad.
Reflections can be avoided by using natural light instead of the flash.


It is best to use a quiet background, that is, one that does not take away the attention from the subject.
For example, create your own little studio by hanging some white or light grey cloth in your workshop.
Cloth does not reflect disturbingly, is available in many colors, and is cheap, too!
Try to focus your camera well, so that as many details are visible as possible.
To shoot close-ups of details of the radio, use the MACRO setting of your camera.
Gerard Tel