Using the computer in space geometry
A previous version of this article appeared in Zentralblatt für Didaktik der Mathematik, Jahrgang 24, Heft 5, 1992.
Abstract
First some changes in the space geometry curriculum in The Netherlands are sketched. A part of the changes in the lower grades of secondary education and almost the complete change of the space geometry in the higher grades. During this sketch the need for the use of a computer will raise. In the second part of this paper it will be shown how computertools assist this new space geometry curriculum.
Space geometry
The national program
In 1990 space geometry regained its place as a main subject in the curriculum for secondary education in The Netherlands. Until that year students in higher grades of pre-vocational education had to solve problems on three dimensional geometry using algebraic tools. Most of the problems posed in final examinations couldn't even be solved in a geometrical way, because they were not designed for such treatment.
In the new curriculum vectoralgebra has disappeared. It is no longer possible to use vectoralgebra for solving an exercise, without having any idea of the spatial situation. Consequently the students will be confronted with problems in which "they have to use their spatial imaginative power to find a solution" (quoted from the new National Program). Much attention must be paid to the development of students' spatial intuitions not only as a preparation for space geometry, but mainly as a source for geometry in general.
The nationwide introduction of the new program was preceded by the Hawex-project (1987 - 1991) for pre-vocational education (age 15 - 17). Through field tests the new curriculum was developed. Some of the schools also used computertools to support space geometry.
Space-geometry for the lower grades (age 12 - 16) is changed through the project W12-16. This new curriculum has been tested in a number of schools. The nationwide introduction of this part of the curriculum took place in august 1993.
Some space-geometry in the lower grades
Among others there are two important goals for space-geometry in the lower grades (see [E. de Moor]):
- Students learn to "read" pictures of spatial situations, like photo's, maps, etc. They must be able to make a spatial image of the picture and make drawings of the image on paper.
- Students must be able to see intersecting planes in spatial objects and try to predict or to draw the true (two-dimensional) shapes of these planes.
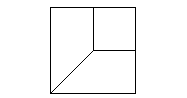
In the first two years of secondary education students learn how a spatial effect in pictures of for example a cube is created (see fig. 1 below). Students work with cross-sections of spatial objects. This prepares for situations in every day life where many properties of spatial objects are explained by their cross-sections (e.g. in architecture, biology, medicine).
In the higher grades students have to work with pictures of spatial situations and objects. A problem for these students is that in the past very little attention has been paid to space geometry in the lower grades. Especially to the ability: "How to read pictures of three-dimensional situations?" Therefore in the higher grades students often are not able to make the correct spatial images of these pictures. For example:
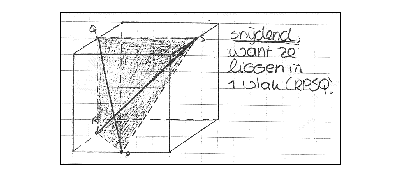
Do these two lines intersect?
The answer of a student (age 16) in the question above: "Intersecting, because they lay in one plane (RPSQ)."
How to start this part of space-geometry? According to didactical principles of realistic mathematics education See For more information on realistic mathematics education we refer to: - A. Treffers, F. Goffree: Rational Analysis of Realistic Mathematics Education - The Wiskobas Program, Proceedings of the Ninth International Conference for the Psychology of Mathematics Education Vol II, Freudenthal Institute, The Netherlands, 1985. - J. de Lange: Mathematics, Insight and Meaning, Freudenthal Institute, The Netherlands, 1987. - K. Gravemeier e.a.: Context Free Productions Tests and Geometry in Realistic Mathematics Education, Freudenthal Institute, The Netherlands, 1990. More about space geometry in The Netherlands can be found in: - A. Goddijn, M. Kindt: Space Geometry Doesn't Fit in the Book, Proceedings of the Ninth International Conference for the Psychology of Mathematics Education Vol I, Freudenthal Institute, The Netherlands, 1985. - E. de Moor: Geometry-instruction (age 4-14) in The Netherlands -the realistic approach-, Realistic Mathematics Education in Primary School (ed. L. Streefland), Freudenthal Institute, The Netherlands, 1991. the space around us, is very often used as a source for problem posing. So you start with real (or mathematical) objects and pictures that are well known to the students. What spatial objects do you intersect in every day life? Food! An example is the following exercise about a large sausage:
How to cut a sausage?
- Are the cross-sections possible? If yes, explain how to cut the sausage in order to make the cross-section visible.
With this kind of questioning we try to reach the above mentioned goals. By confronting the students alternately with three-dimensional objects, with pictures of three-dimensional objects and cross-sections in these objects we practice the ability of making spatial views.
From food the step is made to more mathematical figures, like the cube and the pyramid. When you make this step you don't want to bother students with difficult construction methods. These methods can be avoided by using a computer. The computer (with the appropriate software) can create a fluent layer between concrete materials, that have to be used in space-geometry, and pictures or drawings. Pictures on the computerscreen are not just two-dimensional pictures. When you are able to manipulate an object, to rotate or enlarge for example, you get a better idea of the way the object is situated in space. So an important feature of the software should be:
To create an environment in which students can investigate cross-sections in polyhedra, cut these polyhedra into parts, and can simply correct wrong cuttings.
What do you see?
The following example is taken from one of the Hawex booklets Tekenen wat je weet (Draw what you know) See Materials on space geometry developed at the Freudenthal institute are: - A. Goddijn: Shadow and depth, 1980. - M. Kindt, J. de Lange: Lessons in space geometry, 1982. - A. Roodhardt: Verkenning in de ruimte, 1989. - A. Roodhardt: Tekenen wat je weet, 1990. - A. Roodhardt: Op maat gesneden, 1990. .

Cube and shadow.
This photograph of a cube was taken on a tropical island, so the sunbeams are directed almost perpendicular to the ground.
- In the picture only part of the shadow is visible. What will the shadow look like "behind" the cube?
By changing the position of the cube or the sun, you can find different shapes of shadow. Assume the edge of the cube has length 1.
- At which positions of sun and cube the shadow will be a square of 1 by 1?
- Describe a situation in which the shadow is a square with edges of length
 .
.These are difficult problems. Without the help of concrete materials most students (and teachers?) cannot solve it. Having real cubes by hand students work (in small groups) on this problem for a long time, very actively examining the cubes from many different viewpoints. At the end of the course students must be able to imagine mentally what certain objects look like from any given viewpoint. For many students this is very difficult to learn. You need some courage to do so. Very often you hear the lamentation in the classroom "I don't see it!" Of course concrete (models of) solids are very important for the students to get familiar to the idea of how objects look like from any viewpoint.
We felt that a certain kind of software should also be of great help as an intermediate phase between the use of concrete materials and the mental activities we wanted them to perform. A first important feature of this software is:
To offer the possibility to look at objects from different viewpoints.
Such software is also helpful for problems like:

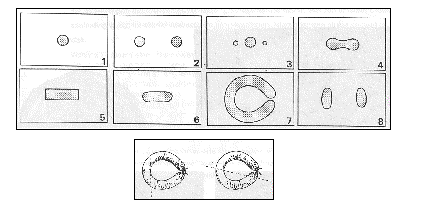
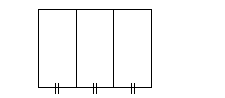
Six times two lines
In this picture you see two lines l and m in a top-view projection (l Æ l', m Æ m').
- Which positions of the two lines (intersecting, skew, parallel) are possible in each of the six pictures?
In general one picture is not enough to decide about the positions of the two lines. Two pictures from different viewpoints may give enough information about the positions.
Dynamical definitions of spatial objects
Look at the following definition of a prism, taken from a textbook on geometry:
"A prism is a solid composed of a number of faces, the upper and the lower face are parallel and the lateral faces are parallelograms."
It is difficult to imagine some real solid by such a dull, static and meaningless description. With their hands moving through the air, but mentally too, students can build solids very easily with the help of so called dynamical definitions (or recipes).
The recipe for a prism: "A prism arises by moving a polygon parallel to the startposition along a given line."
Once you have chosen a polygon and a direction for the translation, you can see it grow. For defining a pyramid in this way, you only have to reduce linearly the perimeter of the polygon.
The choice for these dynamic definitions is a didactical one. It offers the students the possibility to "grasp the space". Immaterial objects like the sunbeams and the working space of robotarms become almost material too when described dynamically.
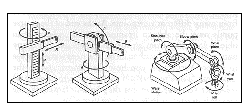
Working space of robotarms.
The enclosed space of an electronic wave guide can be created by translating and at the same time rotating a rectangle along a given line.
Two dimensional representations of spatial objects
Two quotations from the National Program:
"Concrete examples (like sculptures and buildings) are very important as illustrations for students to get insight into the subjects of space geometry. Photographs and drawings can be used presenting such objects."
"The student must know that every method of drawing is a convention and that the relation to the three-dimensional reality depends on the method of drawing that is used."
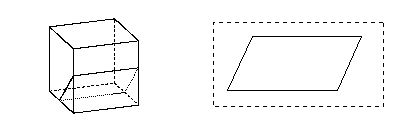
For these reasons attention is paid to different methods of projection. In the following figure you see two ways of drawing a cube: an example of an oblique projection and one of an orthogonal projection. Both are parallel projections.
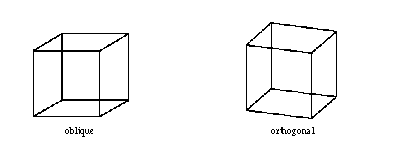
Two projections of a cube
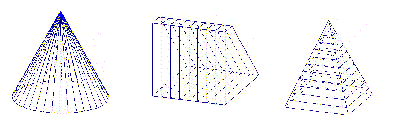
The left one is commonly used in textbooks on geometry. Many students and teachers don't recognize a cube in the right picture, because they are so used to the left one. Do they recognize a cube, or do they recognize the picture? The same projection methods used for a cone will show that the oblique projection doesn't give a natural perspective.

Two projections of a cone
Using photographs and drawings as a source for problems means that students have to learn about differences between methods of projection. And not only about the parallel projections, but also about the central projection.
Architects for example, mostly use an orthogonal parallel projection when they present their creations:
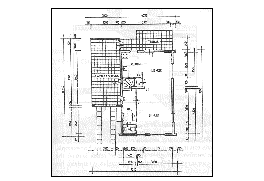
Drawing from an architect.
But often they use an oblique parallel projection, for example to make a plan of a room look more spatial:
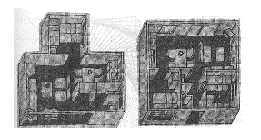
View of a room.
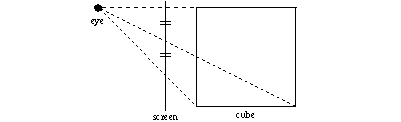
When students use photographs they must know the difference between parallel and central projection. Using the computer the difference can be examined by putting the eye near to the object (central) or far away from the object (parallel and orthogonal).
A cube
When the above picture is a front-view of the cube, a side-view is very helpful to solve the problem:
A side-view of the projection of a cube
Very specific ways of orthogonal parallel projection are the XY-projection (top-view), the XZ-projection (side-view) and the YZ-projection (front-view). These three ways of drawing are often very useful in exploring problems. Front-view and top-view are also easy tools to investigate the next problem:
An exercise.
The faces DCF and ABE are parallel. Lines AB and CD are skew. In the picture BD seems to be the shortest horizontal connection between AB and CD.
The last important feature for the software that we defined is:
To offer the possibility to use different methods of projection and to compare them.
Summary
For the features mentioned above software was needed in both the project W12-16 and the Hawex-project. At that moment nothing was available that could meet our demands. So the msdos-computerprograms Doorzien and Ruimfig See For information about Ruimfig or Doorzien please contact: L.M. Doorman (M.Doorman@fi.uu.nl). A demo-version of a new program for Windows in which Ruimfig and Doorzien are integrated is available on this cdrom. were developed during the projects. During this development parts of the software were adapted to the curriculum and parts of the curriculum were adapted to the software. Some schools involved in the projects worked with Doorzien or Ruimfig. Doorzien is also translated into German with all kinds of studentmaterials and didactical hints See Heinz Schumann: Korperschnitte, Raumgeometrie interaktiv mit dem computer. Dümmler, 1995. . The two programs are in the mean time redesigned into one program Doorzien for Windows.
The computer
We take the computertool Doorzien as an example of using the computer in space geometry. Problems are posed "outside" the programs and can be explored using the software. In the first paragraph 2.1 an idea of the use of Doorzien in the lower grades is given. The next three paragraphs will show how the program is used in the new space geometry curriculum for the higher grades. Each paragraph contains one of the features the software was developed for.
Intersecting a cube
After some introductory exercises two girls in the second grade (age 14) arrive at the cube:
Draw a cross-section in the cube and draw the shape of the cross-section next to it.
They draw the plane through two parallel face-diagonals in the cube. This cross-section is familiar for them. A rectangle is drawn next to it. It seems as if there is no problem. But with the next cross-section, they drew a parallellogram:
What is the shape of this cross-section?
Strange. Self made cross-sections were no problem for the girls, but the shape of this cross-section is wrong. In the next exercise they discover a feature of the computerprogram. This feature takes the cross-section out of the cube and rotates it until you see the real shape (i.e. looking at it from a perpendicular direction).
After giving the proper command they see on the screen:
The shape of the cross-section
"Oh...of course...", one of the girls mumbles, "a cube has only right angles"!? She removes the first solution of the exercise and draws the rectangle next to the cube.
Another exercise is about a cube with a triangular cross-section. With the computerprogram it is possible to move this cross-section in the cube. The movement is perpendicular to the cross-section, the next cross-section is parallel to the previous one. What different shapes have the parallel cross-sections?
The girls move the triangle carefully backwards, until they see the largest possible triangle:
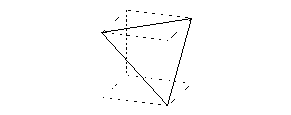
Largest triangle in the cube
They were asked what would happen when the cross-section moves a little more backwards. "Well, you pass this point." She points to a vertex of the cube. She explains with help from the picture on the screen that the cross-section will get one more side passing that point. She concludes: "There are three such points, so the cross-section will have six sides when you move it backwards." They move the cross-section backwards and see their hypothesis come true.
Doorzien offers more possibilities for investigating a cross-section. A polyhedron can be cut in two parts. Each of the two parts can be selected for further investigation.
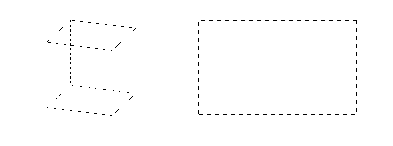
At any moment it is possible to let the computer draw a fold-out of the polyhedron:
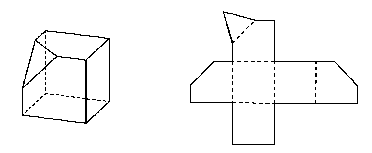
A fold-out (Schermafdruk?)
In this way students can create their own diamond-like polyhedra, print the fold-outs, make glue strips and put them together. Unfortunately, no printer was available in the classroom at that moment.
While the two girls worked with Doorzien, they had to make spatial images of pictures on the screen. This training of spatial ability is an important part of space geometry. At the same time the exercises and the way students work with Doorzien met the goals that were formulated in the first part of this paper.
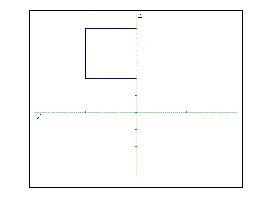
Projecting the cube
After exploring spatial objects and their cross-section spatial coordinates and different projections are introduced. The standard projection of a cube in Doorzien is the engineers-projection. When also the axes are draw you get the following picture:
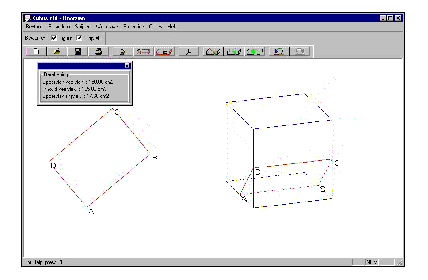
A cube in Doorzien
The position of the cube in space is not clear from this picture. It is possible to choose other projections. The students (16 years old) are asked to look at the three parallel projections of the cube on the XY-plane, the YZ-plane and the XZ-plane. Units are visible on the axes.
The projection on the XZ-plane
- What are the coordinates of the corner points of the cube?
- Move the centre of the cube to the origin (using the submenu "Transform").
- Check your transformation with the projections on the different planes.
When the central projection is used, you can change the point from which it projects the object on a plane through the origin, perpendicular to the line from this point to the origin. The last question involves this method of projection.
With these exercises students get familiar with Doorzien and with some of the advantages and disadvantages of the program. For example it is hard to see whether or not a line is in front of another line. In general, one projection of an object doesn't give enough information about the position of the object in space. While answering the exercises the students get a notion of this principle in an "active way". They learn that different projections give different information about the object. You need the top- and the side-views for the determination of the coordinates and for measuring the sides of the cube, but other projections, like the central projection from a proper viewpoint, give a better spatial view of the object.
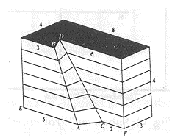
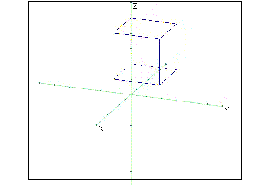
The electronic wave guide
The exercise about the electronic wave guide is from one of the booklets of the Hawex-project and is mentioned before. The electronic wave guide can be built up from a rectangle with the command "Translate and Rotate". When the object is finished it is easy to project it in different ways. Doing this, some questions about the wave guide can be answered easily.
First we need a rectangle. Objects can be built and after successive combined transformations Translate and Rotate you see the following:
An electronic waveguide in Doorzien
During the transformation the waveguide arises on the screen as a sequence of rotated and translated rectangles. The arising gives a spatial effect to the picture . This dynamical effect can not be illustrated on paper. Now you can visualize more difficult questions about this wave guide.
The parallel projection in the direction of the translation reveals the next picture. It answers the previous question in the booklet about the shape of the opening of the wave guide.
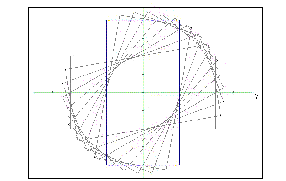
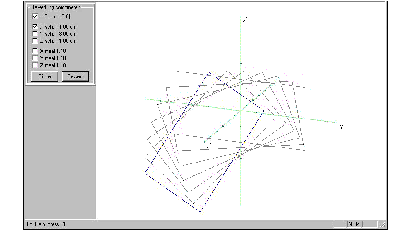
Art in Eindhoven
This problem deals with the facility of the program to look at an object from different viewpoints using the central projection. The exercise starts with three photographs of a sculpture in Eindhoven.


The sculpture (not finished yet) in a cube in Doorzien.
Second, they are asked questions about this object.

Different views of the sculpture
When students solve this problem they carefully move their head around an invisible object in their hands. Trying to look at the "real" object from the right position.
Such exercises are perfect as an intermediate stage between working with concrete materials and working with pictures or photographs in space geometry. Especially when there are still some concrete materials near the computers that can be used by the students.
Final remarks
It is difficult to give an accurate description of the contribution of the computer in space geometry. To what extend does it help in developing some spatial imaginative power?
With the examples in this paper we showed that using software gives at least more (didactical) possibilities in space geometry. With a last example we will show that also students learn something from the software.
In the worksheets that support Doorzien students had to answer questions about front-views of a cube. The front-view (a square) was on the screen and they were asked to find rotations to get given other front-views of the cube, for example a hexagon.
One of the teachers asked the students a few lessons after working with Doorzien:
A front-view of a cube is a square. The cube can be rotated around a vertical axe until you see the following picture:

Drawing a top-view
When this step is made by the students, we think that working with software like Doorzien really helped them in space geometry. The main reason for using the computer is not in the first place the pictures that can be made easily. The main purposes are the features mentioned in chapter two:
1. To create an environment in which students can investigate cross-sections in polyhedra, cut these polyhedra into parts, and easily can correct wrong cuttings.
2. To offer the possibility for looking at three dimensional situations from different viewpoints in order to collect more information about the situation.
3. To offer the possibility to translate, rotate and enlarge/reduce two- and three-dimensional objects. In such a way that three-dimensional objects can be built "dynamically" from two-dimensional objects.
4. To offer the possibility to use different methods of projection and to compare them.
notes
-
For more information on realistic mathematics education we refer to:
- A. Treffers, F. Goffree: Rational Analysis of Realistic Mathematics Education - The Wiskobas Program, Proceedings of the Ninth International Conference for the Psychology of Mathematics Education Vol II, Freudenthal Institute, The Netherlands, 1985.
- J. de Lange: Mathematics, Insight and Meaning, Freudenthal Institute, The Netherlands, 1987.
- K. Gravemeier e.a.: Context Free Productions Tests and Geometry in Realistic Mathematics Education, Freudenthal Institute, The Netherlands, 1990.
More about space geometry in The Netherlands can be found in:
- A. Goddijn, M. Kindt: Space Geometry Doesn't Fit in the Book, Proceedings of the Ninth International Conference for the Psychology of Mathematics Education Vol I, Freudenthal Institute, The Netherlands, 1985.
- E. de Moor: Geometry-instruction (age 4-14) in The Netherlands -the realistic approach-, Realistic Mathematics Education in Primary School (ed. L. Streefland), Freudenthal Institute, The Netherlands, 1991. -
Materials on space geometry developed at the Freudenthal institute are:
- A. Goddijn: Shadow and depth, 1980.
- M. Kindt, J. de Lange: Lessons in space geometry, 1982.
- A. Roodhardt: Verkenning in de ruimte, 1989.
- A. Roodhardt: Tekenen wat je weet, 1990.
- A. Roodhardt: Op maat gesneden, 1990. -
For information about Ruimfig or Doorzien please contact: L.M. Doorman
(M.Doorman@fi.uu.nl). A demo-version of a new program for Windows in which Ruimfig and Doorzien are integrated is available on this cdrom.