Hey, Look At This!
In this chapter we will add presets. A preset is a predefined setting of parameters, usually one that shows an interesting region. We chose to store all parameters except the color scheme with a preset. The code of this stage can be found in branch 5-presets.
Presets module
We use a module presets to define two types that we need.
#![allow(unused)]
fn main() {
pub struct Preset {
    cx: f64,
    cy: f64,
    zoom: i32,
    iter_depth: i32,
}
}
The various parameters needed for storing a preset are defined in struct Preset.
The names of the fields should be clear enough. The fields are not public, but there are public functions (not shown here) that give read access.
#![allow(unused)]
fn main() {
struct Presets { ... }
impl Presets {
    pub fn new() -> Presets {
    }
    pub fn names(&self) -> &[&str] {
    }
    pub fn len(&self) -> usize {
    }
    pub fn get(&self, i: usize) -> &Preset {
    }
}
}
The struct Presets gives access to all presets. Function names gives their names for use in the user interface. len gives the number of presets and get gets a reference to a preset, given a (zero based) index.
Changes to the main window
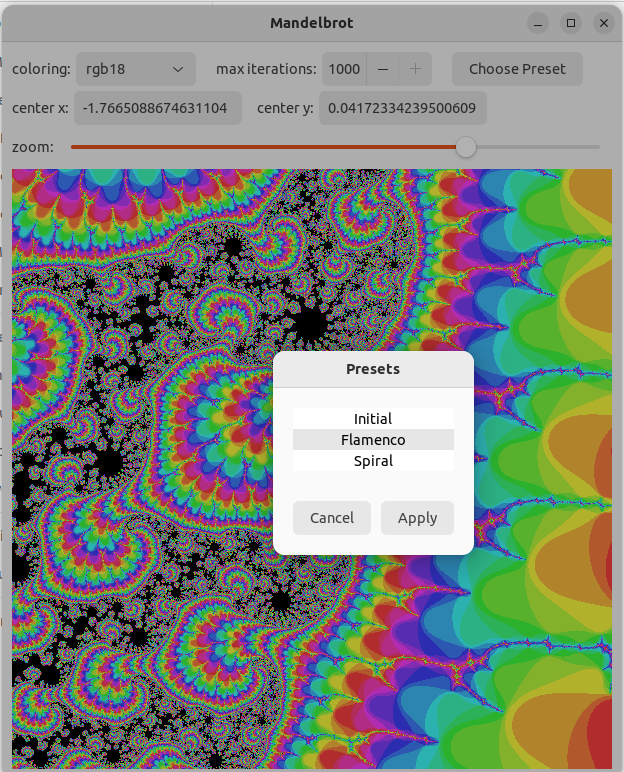
We will use a modal window (preset_window) to present the choice of presets. The main window gets a button that shows that window.
#![allow(unused)]
fn main() {
    let preset_btn = Button::builder()
        .label("Choose Preset")
        .margin_start(15)
        .build();

    first_row.append(&preset_btn);

    preset_btn.connect_clicked(clone!(@strong preset_window =>
        move |_btn| preset_window.present();));
}
We use a new widget, Button. We put a label on the button and place it in the top row. We attach a handler to the 'clicked' signal of the button. This function presents the preset window to the user.
The preset window
The preset window makes it possible to select a preset. It communicates this choice through the state.
#![allow(unused)]
fn main() {
State {
    ...
    preset: Option<u8>,
}
}
If a preset was selected, it will be put in the field preset. This field will be None otherwise. We also implement a getter and setter (not shown).
#![allow(unused)]
fn main() {
    let presets = Presets::new();
    let preset_window = build_preset_window(&state, &presets);
    preset_window.set_transient_for(Some(&window));
    preset_window.connect_hide(
        clone!(@strong state, @weak zoom_adj, @weak iter_adj, @weak cx_value, @weak cy_value =>
            move|_w| preset_ready(&state, &cx_value, &cy_value, &zoom_adj, &iter_adj, &presets)),
    );
}
When we build the user interface, we call a function to build the preset window. This function takes a struct with all presets. We make the (modal) preset window transient for the main window. This means that it will be placed on top of that window. We attach a handler to the 'hide' signal of the window.
fn preset_ready(
state: &Rc<RefCell<State>>,
cx_value: >k::Entry,
cy_value: >k::Entry,
zoom_adj: &Adjustment,
iter_adj: &Adjustment,
presets: &Presets,
) {
let preset = state.borrow_mut().take_preset();
if let Some(preset) = preset {
let preset = presets.get(preset as usize);
cx_value.buffer().set_text(preset.cx().to_string());
cy_value.buffer().set_text(preset.cy().to_string());
zoom_adj.set_value(preset.zoom());
iter_adj.set_value(preset.iter_depth());
}
}
The preset_ready handler function takes the preset index from the state, leaving a None in place. If a preset index was set, the corresponding user interface widgets are set with the appropriate values. This will make sure that the mandelbrot figure is redrawn, through the handlers of those widgets.
Now let's focus on building the preset window.
fn build_preset_window(state: &Rc<RefCell<State>>, presets: &Presets) -> Window {
    let preset_view = ... // see below
    let cancel_btn = Button::builder().label("Cancel").build();
    let ok_btn = Button::builder().label("Apply").margin_start(10).build();
    let ready_box = gtk::Box::builder()
        .orientation(gtk::Orientation::Horizontal)
        .margin_top(30)
        .margin_start(20)
        .margin_bottom(20)
        .margin_end(20)
        .build();
    ready_box.append(&cancel_btn);
    ready_box.append(&ok_btn);
    let content_box = gtk::Box::builder()
        .orientation(gtk::Orientation::Vertical)
        .build();
    content_box.append(&preset_view);
    content_box.append(&ready_box);
We explain the creation of the list of presets later. For the rest, we define two buttons here. The user can press the 'cancel' button if he doesn't want to set a preset after all. Otherwise, he can press 'apply'. There are two boxes to line things up the way we want.
#![allow(unused)]
fn main() {
   let win = Window::builder()
       .title("Presets")
       .modal(true)
       .resizable(false)
       .deletable(false)
       .hide_on_close(true)
       .child(&content_box)
       .build();

   win
}
}
Next we look at the window. We give it a title and make it modal. It is not resizable andwe don't want a delete decoration. When we close it, we want to hide it, not delete it. And it should have the content_box as a child.
#![allow(unused)]
fn main() {
    let preset_list= SingleSelection::new(Some(StringList::new(presets.names())));
    let factory = SignalListItemFactory::new();
    factory.connect_setup(preset_setup);
    factory.connect_bind(preset_bind);
    let preset_view = ListView::builder()
        .model(&preset_list.clone())
        .factory(&factory)
        .margin_top(20)
        .margin_start(20)
        .margin_end(20)
        .build();
}
Now we get to the list view. We could have used a drop box here, as we did with the color schemes, but in this way we learn something new.
A ListView is a widget to show all kinds of lists, possibly very long. Unfortunately that means that there is more to take care of than in a DropBox.
A ListView takes a SelectionModel and a ListItemFactory. The first is a list with selection capabilities added. In our case, we use the predefined StringList class and wrap it in the SingleSelection class. We initialize the StringList with the names of the presets.
The factory creates the rows of the ListView. Here, we use the predefined SignalListItemFactory. This factory should respond to signals that are sent when the ListView wants something from the factory. Here we connect to the 'setup' and 'bind' signal. We discuss them below, where we have a look at the handler functions.
#![allow(unused)]
fn main() {
    cancel_btn.connect_clicked(clone!(@weak win, @strong state => move |_| {
       state.borrow_mut().set_preset(None);
       win.set_visible(false);
   }));
   ok_btn.connect_clicked(clone!(@weak win, @strong state => move |_| {
       let sel = preset_list.selected();
       state.borrow_mut().set_preset(Some(sel as u8));
       win.set_visible(false);
   }));
}
When the cancel button is pressed, we store None as preset value in the state.
When the apply button is pressed, we ask which element from the presets list is selected and store that value in the state. In both cases we hide the preset window.
#![allow(unused)]
fn main() {
fn preset_setup(_fac: &SignalListItemFactory, item: &ListItem) {
   item.set_child(Some(&Label::new(None)));
}

fn preset_bind(_fac: &SignalListItemFactory, item: &ListItem) {
   if let Some(widget) = item.child() {
       if let Some(obj) = item.item() {
           if let Ok(str) = obj.downcast::<StringObject>() {
               if let Ok(label) = widget.downcast::<Label>() {
                   label.set_text(&str.string());
               }
           }
       }
   }
}
}
The function preset_setup handles the 'setup' signal. This signal occurs when the listview needs to obtain another row widget. We should call the the function set_child on the ListItemthat is passed as argument. In our case, we add a label, which is all that we show in a row.
The function preset_bind handles the bind signal. This signal occurs when a row needs to be attached to the data of one item of the model. In our case, the rows contain a label and the model items contain a string, which we set as the text of the label. The biggest part of the code is making sure that the option values are not None and that the object and widget can be cast to the type we expect them to be (StringObject and Label).
Having two stages for filling rows seems needlessly complicated. But this caters for cases where you have very large models of which you see only a few rows. The rows can be reused when other items our shown, by binding them to other items. There are two other signals: 'unbind' is the opposite of 'bind' and 'teardown' the opposite of 'setup'. We don't need to act on those signals.