Mandelbrot with gtk-rs
In this tutorial we show how gtk-rs, the rust version of the gnome toolkit, can be used to make a user interface to show the Mandelbrot figure. We use gtk4.
The gtk-rs website contains a nice book that explains many things. This tutorial aims to be complementary to this book. Although self contained, it pays less attention to things that are treated well there. Don't see this tutorial as an advice on how things should look. I am the last person you should hire if you want that kind of expertise.
This tutorial is accompanied by a github repository. The different stages of the application, treated here in one chapter per stage, correspond to a branch in the repository.
The stages are:
- The base. A window that shows the Mandelbrot figure, without any interaction. We use a DrawingArea and an ImageSurface.
- The first interaction: respond to resize signals.
- Add user interface elements to change the viewing parameters. Zoom in on a point and adapt the amount of detail shown. Uses the widgets Label, Entry, Scale and SpinButton and Box.
- Change the focus point by clicking. Uses GestureClick.
- Let the user select a coloring scheme. Uses DropDown.
- Present presets to the user, a way to set viewing parameters to an interesting region. Uses a modal Window, Button, ListItem, ListView, SignalListItemFactory, SingleSelection and StringObject.
- Develop an alternative for ImageSurface, necessary for the next stage. Uses the function
create_for_data_unsafe. - Stop freezing the user interface during computation of the Mandelbrot figure. Uses the functions
spawn_blockingandspawn_future_local. - Use threads to speed up the computation. Not a user interface thing, but definitely nicer for the user.
The Base
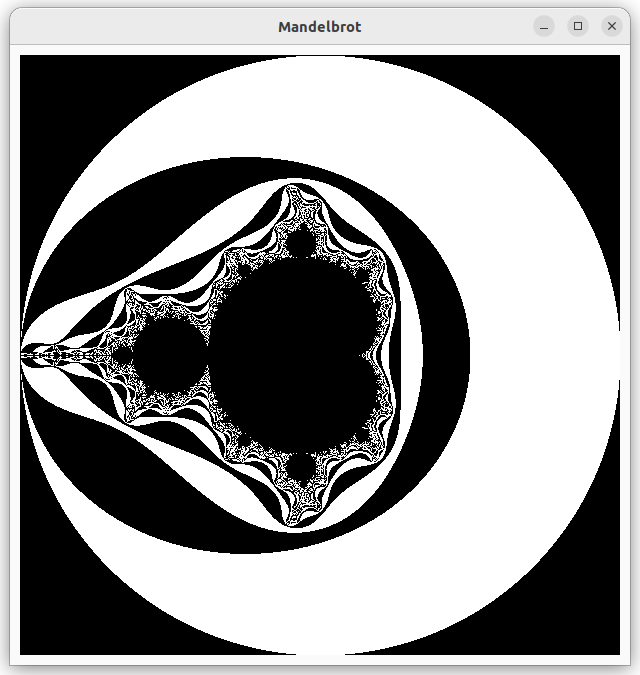
The code of this stage can be found on branch 0-base. In this stage we will make an application that looks like this:
 .
.
This is not meant to be a tutorial about mathematics, so we will not go into detail about the mandelbrot set. If you are interested, you can find a lot of information on the web. For our purposes it is enough to know that we have a function from the mathematical x-y-plane to positive integers. The integer indicates how many iterations we have to make before we reach a stop criterion, given a point in the plane. We may never reach this criterion, so we have a limit on the iteration depth. We will call this integer value the mandelvalue of a point in the plane.
The interesting part of the figure lies inside a circle around the origin with radius 2. Outside this circle, the stop criterion is reached in one step. In the picture above, we just see the complete circle. We use black and white for odd or even mandelvalues respectively.
The window will be used as a map that shows a part of the mandelbrot figure. In file mandel_image.rs we find the struct Mapping which deals with this. In a map, the scale is important. We define the scale as the width (or height) of the rectangle in the mathematical plane that corresponds to one pixel of the window. So, if we want to to see the interesting region of size 4x4 in 800x800 pixels, we should set the scale to 4/800=0.005.
The parameters cx and cy are the coordinates of the point that will be mapped to the center of the window. The parameters win_width and win_height give the size of the window in pixels. We talked already about the parameter iteration_depth, which decides how much detail is shown.
#![allow(unused)]
fn main() {
pub struct Mapping {
    pub cx: f64,
    pub cy: f64,
    pub scale: f64,
    pub win_width: usize,
    pub win_height: usize,
    pub iteration_depth: u32,
}
}
The GUI
Now let's focus onder the user interface in file gui.rs.
The entry point of the application is the function run:
#![allow(unused)]
fn main() {
pub fn run() -> glib::ExitCode {
    let app = Application::builder().application_id(APP_ID).build();
    app.connect_activate(build_ui);
    app.run()
}
}
The first line creates an Application. This uses a typical pattern where a struct has a builder function that creates a builder. The builder has functions to set parameters (which return the builder) and a function build which returns the struct that is built. In this case we only set a globally unique identifier for the application.
The second line calls the function connect_activate on the application that was just created. Functions that start withconnect_ deal with signals. They supply a function that will be called when a signal is emitted. In this case we supply the function build_ui for the activate signal. Notice that this function is not called now.
The third line hands control over to the app. It will start responding to events and emitting signals. Usually, it will emit the activate signal, which calls our build_ui function. But if another application with the same identifier is already running this will not happen. Then it brings that application to the foreground and shuts down itself.
So, let's move to the function that builds the user interface.
#![allow(unused)]
fn main() {
fn build_ui(app: &Application) {
    let canvas = DrawingArea::builder()
        .content_height(WIN_SZ0 as i32)
        .content_width(WIN_SZ0 as i32)
        .margin_start(10)
        .margin_end(10)
        .margin_top(10)
        .margin_bottom(10)
        .build();
    let image = make_mandel_image(&Mapping::new_for_size(WIN_SZ0));
    canvas.set_draw_func(move |_d, ctxt, _w, _h| mandel_draw(&image, ctxt));

    let window = ApplicationWindow::builder()
        .application(app)
        .title("Mandelbrot")
        .child(&canvas)
        .build();
    window.present();
}
}
We have a window with one element: a DrawingArea. In a drawing area we can draw arbitrary things with the cairo library. To create the drawing area, we use the builder pattern and add a width and height for the area, as well as some margins to make some space between the drawing area and the border of the window.
In the drawing area we will display an image. This image is made with the function make_mandel_image. We ask for an image with the same size as the draing area. The function returns an Option<ImageSurface>. The drawing area needs a function that draws something in the area. We set this function with set_draw_func. We pass it aclosure that captures the image we just created.
Next, we create an ApplicationWindow. We associate the application, passed to the function as a parameter, to the window. So, the application will remain alive while the window exists. We set a not very inspired title and make the drawing area the child of this window.
Finally we present the window, which means we show it.
The drawing function for the drawing area is:
#![allow(unused)] fn main() { fn mandel_draw(img: &Option<ImageSurface>, ctxt: >k::cairo::Context) { if let Some(img) = img { ctxt.set_source_surface(img, 0.0, 0.0) .expect("Expected to be able to set source surface"); ctxt.paint().unwrap(); } } }
If img is not None, we set the image as source and then paint it.
Unluckily, at the moment of writing the documentation of the rust cairo library is rather minimal. In this case, there is nothing. You can look at the C api for more information.
Making the Mandelbrot Image
As we want to focus on the user interface, we don't explain the code in mandel_image.rs in detail. We just highlight one point of interest.
The function make_mandel_image returns a Option<gtk::cairo::ImageSurface>.
An ImageSurface has a slice of bytes and an image format, which is used to identify the memory format of image data. In lib.rs we defined:
#![allow(unused)]
fn main() {
const IMG_FMT: gtk::cairo::Format = gtk::cairo::Format::Rgb24;
}
With Rgb24 each pixel is a 32-bit quantity, with the upper 8 bits unused. Red, Green, and Blue are stored in the remaining 24 bits in that order. The 32-bit quantities are stored native-endian. That is why in function fill_mandel_image you find color.to_ne_bytes() to convert a 32 bit color value to 4 bytes, which are then copied to image data.
For the rest, you can have a look at the code, which contains comments to explain things.
One Size Fits All?
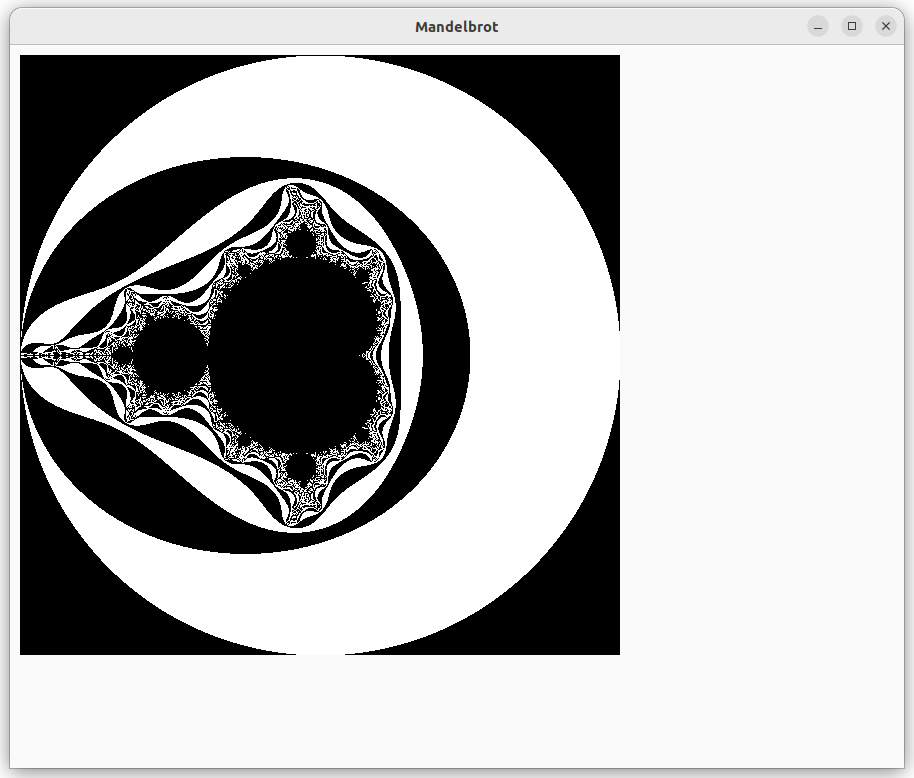
When we resize the application window of the base stage, we see that the picture will not fill the window anymore. This is what we will fix in this stage.
The code of this stage can be found on branch 1-resize.
The program now needs to react to changes and so will need to maintain some state.
We define this struct in a submodule of gui. In this state we keep the size of the drawing area and the picture that corresponds to that size. In fact, we will keep a Mapping object instead of just the size of the drawing area. This will be handy in future stages. And the fields in the state correspond to the argument and result of the function make_mandel_image, which is quite convenient.
#![allow(unused)]
fn main() {
struct State {
    mapping: Mapping,
    img: Option<ImageSurface>,
}

impl State {
    pub fn new() -> State {
        State {
            mapping: Mapping::new_for_size(WIN_SZ0),
            img: None,
        }
    }
    pub fn img(&self) -> &Option<ImageSurface> {
        &self.img
    }
    pub fn on_resize(&mut self, w: i32, h: i32) {
        self.mapping.win_width = w as usize;
        self.mapping.win_height = h as usize;
        self.img = make_mandel_image(&self.mapping);
    }
}
}
The function new creates a mapping where the mandelbrot image just fits in the original drawing area. The image is empty.
The function img returns the current image. It is used in the drawing function.
The function on_resize is called when the size of the window changes. It stores the size in the mapping. The it calls make_mandel_image and stores the result in the img field.
We initialize the state at the start of the build_ui function:
#![allow(unused)]
fn main() {
let state = Rc::new(RefCell::new(State::new()));
}
Why do we need to wrap the state in a reference counted RefCell? The state will be accessed by several functions that we register with gtk. In this stage we need it for drawing and for reacting to the resize signal. In the latter case, we change the state. So we use the interior mutability pattern as described in the rust book. Gtk guarantees that all user interface calls occur on the same thread, so we don't need a mutex or atomic reference counting.
When we build the user interface, we need to inform the application that we want to react to a change of size to the drawing area. There is a signal (resize) that we can connect to.
#![allow(unused)]
fn main() {
canvas.connect_resize(move |_da, w, h| state.borrow_mut().on_resize(w, h));
}
That function should take the drawing area and the new width and height as parameter. We don't need the first, but we do need the state, so we pass it a closure that captures the state. The closure borrows the state mutably and calls on_resize on it.
The other thing that needs to change is how we draw in the drawing area. We have to draw the image that is in the state, instead of the static image. So, in build_ui we have:
#![allow(unused)]
fn main() {
    let state2 = state.clone();
    canvas.set_draw_func(move |_d, ctxt, _w, _h| mandel_draw(&state2, ctxt));
}
Note that we clone the state and move the cloned value. We still need the state in connect_resize that appears after it.
#![allow(unused)] fn main() { fn mandel_draw(state: &Rc<RefCell<State>>, ctxt: >k::cairo::Context) { if let Some(img) = &state.borrow().img() { ctxt.set_source_surface(img, 0.0, 0.0) .expect("Expected to be able to set source surface"); ctxt.paint().unwrap(); } } }
The function mandel_draw needs a small adaptation. We don't pass the static image, but the state and get the image from the state.
Now the picture will again fill the whole drawing area:

Attention, Please!
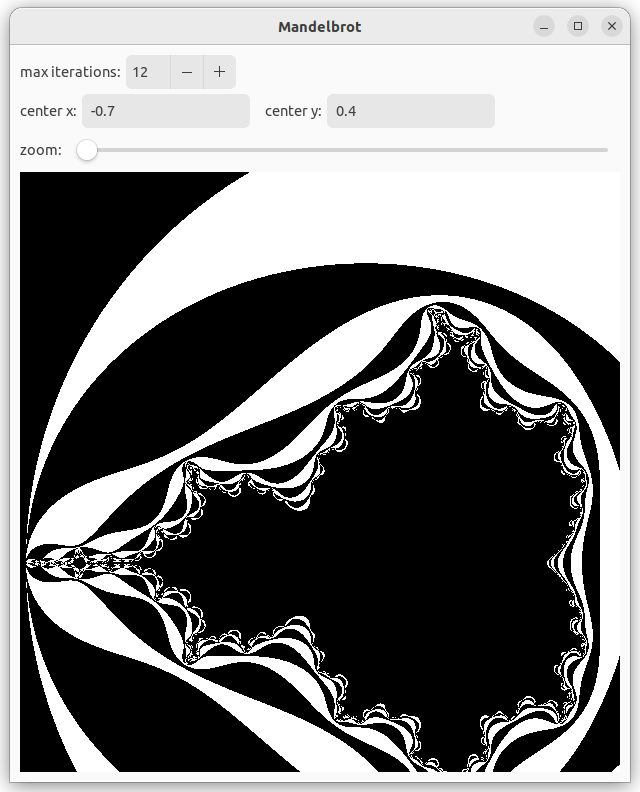
In this stage we will focus on focus. That is, we will make it possible to zoom in, shift the center and increase the computation detail. Below is a picture of the user interface and the image that is a bit zoomed, shifted and rendered with less detail. The code of this stage can be found in branch 2-parameters.
Changes to the GUI
We see that the window is divided in four rows: iterations, center, zoom and the drawing area. The rows are divided in one or more parts, e.g. a label and a user interface element. We will first focus on adding those elements and afterwards on adding actions.
Let's first look at the top row. It contains a label and a SpinButton.
#![allow(unused)]
fn main() {
    let iter_val = state.borrow().iter_depth();
    let iter_adj = Adjustment::new(iter_val, 10.0, 1000.0, 1.0, 0.0, 0.0);
    let iteration_button = SpinButton::builder().adjustment(&iter_adj).build();
    let first_row = make_row_box();
    first_row.append(&Label::new(Some("max iterations:")));
    first_row.append(&iteration_button);
}
The SpinButton is tied to an Adjustment, which is a numerical value with a current value, a minimum, maximum and step value and two page related values that are of no use in a SpinButton. They are set to zero here. The current value is taken from the state.
The row is a Box which is made with the following function:
#![allow(unused)]
fn main() {
fn make_row_box() -> gtk::Box {
    gtk::Box::builder()
        .orientation(gtk::Orientation::Horizontal)
        .spacing(5)
        .build()
}
}
It creates a horizontal row with elements being separated by at least 5 pixels.
The second row contains two labels and two text entry elements:
#![allow(unused)]
fn main() {
    let cx_value = gtk::Entry::builder()
        .text(&state.borrow().cx().to_string())
        .width_chars(15)
        .margin_end(10)
        .build();
    let cy_value = gtk::Entry::builder()
        .text(&state.borrow().cy().to_string())
        .width_chars(15)
        .build();
    let second_row = make_row_box();
    second_row.append(&Label::new(Some("center x:")));
    second_row.append(&cx_value);
    second_row.append(&Label::new(Some("center y:")));
    second_row.append(&cy_value);
}
We made sure to initialize the text with the center values in the state.
The third row conatins a label and a Scale.
#![allow(unused)]
fn main() {
    let zoom_adj = Adjustment::new(0.0, 0.0, 1000.0, 1.0, 0.0, 0.0);
    let zoom_bar = Scale::new(Orientation::Horizontal, Some(&zoom_adj));
    zoom_bar.set_hexpand(true);
    let third_row = make_row_box();
}
The Scale takes an Adjustment as well. The relation between the zoom value and the scale in the mapping is a bit complicated. We will see it later. The step value does not need to be an integer value here, so we could have chosen something different than 1.
We call set_hexpand to tell the Scale that we want to expand it to the full width of the box. In that way, we have maximal control over the slider.
The fourth row only contains the drawing area.
#![allow(unused)]
fn main() {
    let canvas = DrawingArea::builder()
        .content_height(WIN_SZ0 as i32)
        .content_width(WIN_SZ0 as i32)
        .vexpand(true)
        .build();
    state.borrow_mut().set_canvas(canvas.downgrade());
}
A change compared to the previous stage is the call to vexpand. The canvas will be in a vertical box and we need to tell it that the drawing area should occupy available vertical space. Try out what happens if you leave this out and resize the window.
We will need the canvas in some signal handlers. This is why we keep it in the state. But what is this downgrade function? Actually, all user interface elements are reference counted. When we put a Label (or an Entry or something else) in a Box, the box became co-owner of the label. To avoid the possiblity of cyclic ownership, we use a weak reference to the canvas.
Finally, we make the vertical box and add the rows to it.
#![allow(unused)]
fn main() {
    let content_box = gtk::Box::builder()
        .orientation(gtk::Orientation::Vertical)
        .spacing(5)
        .margin_start(10)
        .margin_end(10)
        .margin_top(10)
        .margin_bottom(10)
        .build();
    content_box.append(&first_row);
    content_box.append(&second_row);
    content_box.append(&third_row);
    content_box.append(&canvas);
}
We have a minimal vertical spacing between elements. We put the margins, that used to be around the canvas, around this box.
Actions
We need to associate actions with the new widgets.
#![allow(unused)]
fn main() {
    iter_adj.connect_value_changed(clone!(@strong state => move |a| {
        state.borrow_mut().set_iter_depth(a.value());
    }));
    cx_value.connect_changed(clone!(@strong state => move |e| {
        state.borrow_mut().set_cx(expect_float_value(e));}),
    );
    cy_value.connect_changed(clone!(@strong state => move |e| {
        state.borrow_mut().set_cy(expect_float_value(e));}),
    );
    zoom_adj.connect_value_changed(clone!(@strong state => move |adj| {
        state.borrow_mut().set_zoom(adj.value());
    }));
}
The connection to the signals follows the same pattern. Note that we use the macro clone from gtk::glib to clone the state. In the previous stage we did this explicitly. The annotation @strong means that we do a clone and get a strong reference. With @weak we would have obtained a weak reference.
#![allow(unused)] fn main() { fn expect_float_value(e: >k::Entry) -> Option<f64> { let t = e.text(); if let Ok(value) = t.parse::<f64>() { Some(value) } else { None } } }
The user can type text in the cx and cy widgets. That should be a floating point value, but you never know with users. That is why we have a function that tries to parse the text and returns an optional value.
Changes to the State
As we saw in the previous section, the actions are passed to function in the state. Here we describe what changes there.
#![allow(unused)]
fn main() {
pub struct State {
    mapping: Mapping,
    img: Option<ImageSurface>,
    canvas: WeakRef<DrawingArea>,
}

impl State {
    pub fn new() -> State {
        State {
            ...
            canvas: WeakRef::new(),
        }
    }
    pub fn set_canvas(&mut self, canvas: WeakRef<DrawingArea>) {
        self.canvas = canvas;
    }
}
Only the field canvas is new. It is initialized in new and set withset_canvas. We will see how it is used later on.
#![allow(unused)]
fn main() {
    pub fn iter_depth(&self) -> f64 {
        self.mapping.iteration_depth as f64
    }
    pub fn set_iter_depth(&mut self, value: f64) {
        let iter_depth = value as u32;
        self.mapping.iteration_depth = iter_depth;
        self.recompute_image();
    }
    pub fn cx(&self) -> f64 {
        self.mapping.cx
    }
    pub fn set_cx(&mut self, v_opt: Option<f64>) {
        if let Some(value) = v_opt {
            self.mapping.cx = value;
            self.recompute_image();
        }
    }
    pub fn cy(&self) -> f64 {
        self.mapping.cy
    }
    pub fn set_cy(&mut self, v_opt: Option<f64>) {
        if let Some(value) = v_opt {
            self.mapping.cy = value;
            self.recompute_image();
        }
    }
}
There are getters and setters for the maximum iteration value and the x and y mandelbrot coordinates of the center of the window. Those values are stored in the mapping. When they are changed, the image in the drawing area ahould be recomputed, so we call the function that takes care of that.
#![allow(unused)]
fn main() {
    pub fn set_zoom(&mut self, zoom: f64) {
        let scale = 1.035_f64.powf(-zoom);
        self.mapping.scale = 4.0 * scale / WIN_SZ0 as f64;
        self.recompute_image();
    }
}
The zoom value is exponentially related to the scale. The value 1.035 is chosen by trial and error. The maximum zoom value is 1000, and 1.035^1000 is about 9e14. Near that value, the figure starts to show blocks, because of approximation errors in the floating point computation.
#![allow(unused)]
fn main() {
    fn recompute_image(&mut self) {
        if let Some(img) = make_mandel_image(&self.mapping) {
            self.set_img(img);
        }
    }
    fn set_img(&mut self, img: ImageSurface) {
        self.img = Some(img);
        if let Some(canvas) = self.canvas.upgrade() {
            canvas.queue_draw();
        }
    }
}
}
The function recompute_image is called whenever the mandelbrot image needs to be recomputed. It calls make_mandel_image and sends the result to set_img. The last line of on_resize is also replaced by a call to this function.
The function set_img sets the image and then notifies the drawing area that it needs to redraw. Note that we need to convert the weak reference canvas to a strong reference before we can do that. In the previous stage we got away with not calling queue_redraw, probably because a resize event already took care of that. You can try to leave out this call and see what happens, or rather, what doesn't happen.
React to Clicks
The code of this stage can be found in branch 3-click.
In this stage we will address two annoyances. First of all, moving around the focus by typing in values in the entries cx and cy is cumbersome. We alter the drawing area such that if you left click on a spot, that will become the center of the picture.
#![allow(unused)]
fn main() {
    let gesture = gtk::GestureClick::new();
    gesture.set_button(GDK_BUTTON_PRIMARY as u32);
    gesture.connect_pressed(clone!(@strong state =>
      move |gesture, _, wx, wy| on_clicked(&state, gesture, wx, wy, &cx_value, &cy_value)));
    canvas.add_controller(gesture);
}
We create a GestureClick object, that reacts to the simple click gesture. Gestures can be much more complicated than that, but this will do for our purpose. We state that it must only react to the primary button (left click, usually).
Next, we connect a signal handler with the press event.
Finally, we add the gesture as an event controller to the canvas widget.
#![allow(unused)] fn main() { fn on_clicked( state: &Rc<RefCell<State>>, gesture: &GestureClick, wx: f64, wy: f64, cx_value: >k::Entry, cy_value: >k::Entry, ) { gesture.set_state(gtk::EventSequenceState::Claimed); let (new_cx, new_cy) = state.borrow().win_to_mandel(wx, wy); cx_value.set_text(&new_cx.to_string()); cy_value.set_text(&new_cy.to_string()); } }
In the handler, we claim the event, which means that it won't be handled by other handlers. We convert the window coordinates to coordinates in the mandelbrot space and set the text in Entry cx_value and Entry cy_value. The latter will emit their changed signals, and the drawing area is redrawn because of that.
#![allow(unused)]
fn main() {
impl State {
    // ...
    fn win_to_mandel(&self, wx: f64, wy: f64) -> (f64, f64) {
        WinToMandel::from_mapping(&self.mapping).cvt(wx as usize, wy as usize)
    }
}
}
We add a convenience method to the state in order to convert a drawing area coordinate pair to a mandelbrot space coordinate pair. This functionality already existed in the file mandel_image.rs, where it was needed to compute a mandelvalue for a pixel.
Arguably it would be nicer to drag the picture instead of centering it on a click point. You could implement that by using GestureDrag. Because computing the picture takes a long time, you would probably not want to do that during dragging. You could change the mandel_draw function and state in order to show the movement, but it is getting a bit complicated this way.
Color of max depth
The second annoyance is that if we increase or decrease the iteration depth by one (or any odd number), the picture changes a lot. This is because the whole area where the number of iterations is bigger than the maximum changes color. In this area, it is unknown if the number of iterations is odd, even or infinite. We will use a grey value for those pixels.
We make the changes in file mandel_image.rs.
#![allow(unused)]
fn main() {
fn color_from_mandel(mv: u32, max: u32) -> u32 {
    if mv == max {
        0x808080
    } else {
        if mv % 2 == 0 {
            0
        } else {
            0xffffff
        }
    }
}
}
The function color_from_mandel now takes an extra parameter, the maximum value of mv. We check for this value first and return a grey value if it is equal.
#![allow(unused)]
fn main() {
fn fill_mandel_image(data: &mut [u8], ustride: usize, mparams: &Mapping) {
    // ...
    let mv = mandel_value(x, y, max);
    let color = color_from_mandel(mv, max);
    let bytes = color.to_ne_bytes();
    //...
}
}
At the call site in function fill_mandel_image we have to supply the extra parameter.
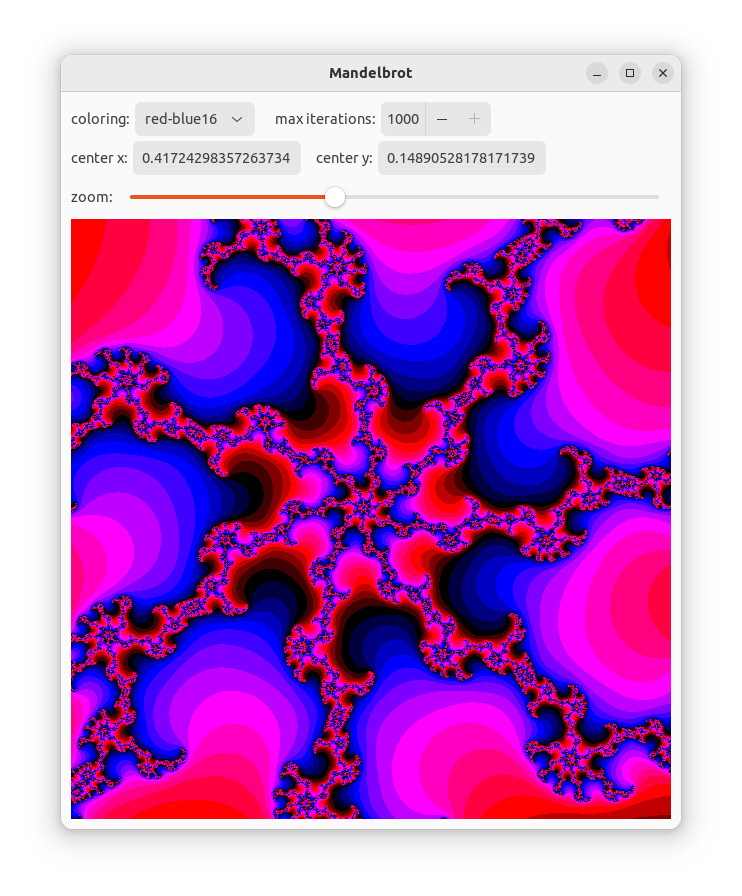
A More Colorful World
In this stage we will add color. The user will be able to choose from several color schemes using a drop down menu. Both black and white schemes that we used thus far will be available, but also some more colorful ones. The code of this stage can be found in branch 4-coloring.
We start by defining a trait that every color scheme must implement. This trait as well as most other new code is in the new file colorings.rs.
#![allow(unused)]
fn main() {
pub trait Coloring {
    fn get_color(&self, v: u32, max: u32) -> u32;
    fn name(&self) -> &str;
}
}
The function get_color has the same signature as color_from_mandel which we implemented in the previous stage. It will replace that function and works in the same way.
The function name returns a name for the color scheme that will be used in the user interface.
#![allow(unused)]
fn main() {
impl ColorInfo {
    pub fn new() -> ColorInfo {
       ColorInfo {
           colorings: all_colorings(),
       }
    }
    pub fn len(&self) -> usize {
       self.colorings.len()
    }
    pub fn scheme(&self, i: usize) -> &Box<dyn Coloring> {
       &self.colorings[i]
    }
    pub fn names_iter(&self) -> NameIter {
       NameIter { iter: self.colorings.iter() }
    }
}
}
The struct ColorInfo collects all color schemes. The function len returns the number of schemes. The function scheme returns a scheme, given an index in the range 0..len. The function names_iter returns an iterator over all the names of the schemes (in the same as in scheme).
Here we don't discuss the implementation of the different color schemes. Have a look at the code, if you are interested.
Changes in the State
In the user interface we have to keep track of the current color scheme.
#![allow(unused)]
fn main() {
struct State {
    mapping: Mapping,
    img: Option<ImageSurface>,
    col_idx: usize,
    color_info: ColorInfo,
    canvas: WeakRef<DrawingArea>,
}
}
The index of the current color scheme is stored in col_idx. We also need access to the color schemes from callback functions, so we store a ColorInfo object.
#![allow(unused)]
fn main() {
impl State {
    pub fn new() -> State {
        State {
            col_idx: 0,
            color_info: ColorInfo::new(),
            ...
        }
    }
    pub fn coloring_names(&self) -> Vec<&str> {
        self.color_info.names_iter().collect()
    }
    pub fn set_col_idx(&mut self, col_idx: usize) {
        self.col_idx = col_idx;
        self.recompute_image();
    }
    ...
}
}
In the function new those fields are initialized. The function coloring_names returns a vector the names. The function set_col_idx allows changing the coloring. It takes care that the image is recomputed.
#![allow(unused)]
fn main() {
    fn recompute_image(&mut self) {
        let coloring = self.color_info.scheme(self.col_idx);
        if let Some(img) = make_mandel_image(&self.mapping, coloring) {
            self.set_img(img);
        }
    }
}
In recompute_image we get the color scheme belonging to the color index and pass that scheme as an extra parameter to make_mandel_image. That functions passes this scheme through until the point where it gets used instead of function color_from_mandel.
Changes in the GUI
#![allow(unused)]
fn main() {
    let colorings = DropDown::from_strings(&state.borrow().coloring_names());
    colorings.set_width_request(120);
    colorings.set_margin_end(15);
    // ...
    first_row.append(&Label::new(Some("coloring:")));
    first_row.append(&colorings);
}
We add a DropDown user interface element. This dropdown is initialized with a list of all color scheme names.
We put this drop down widget on the first row.
#![allow(unused)]
fn main() {
    colorings.connect_selected_notify(clone!(@strong state => move |dd| {
        color_changed(&mut state.borrow_mut(), dd);
    }));
}
We connect a handler to the signal selected-notify of the drop down widget.
#![allow(unused)]
fn main() {
fn color_changed(state: &mut State, dd: &DropDown) {
    let sel = dd.selected();
    if sel != GTK_INVALID_LIST_POSITION {
        state.set_col_idx(sel as usize);
    }
}
}
The signal handler gets the selected line from the drop down widget and stores it in the state.
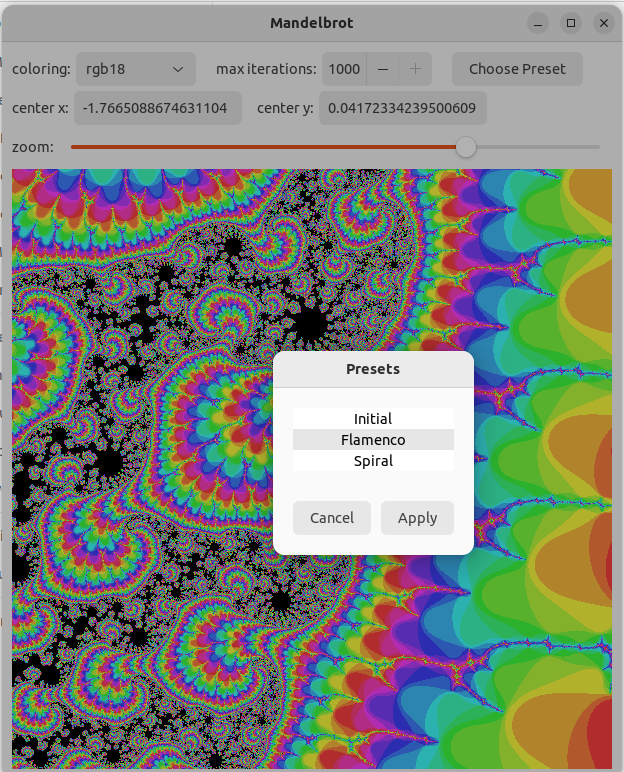
Hey, Look At This!
In this chapter we will add presets. A preset is a predefined setting of parameters, usually one that shows an interesting region. We chose to store all parameters except the color scheme with a preset. The code of this stage can be found in branch 5-presets.
Presets module
We use a module presets to define two types that we need.
#![allow(unused)]
fn main() {
pub struct Preset {
    cx: f64,
    cy: f64,
    zoom: i32,
    iter_depth: i32,
}
}
The various parameters needed for storing a preset are defined in struct Preset.
The names of the fields should be clear enough. The fields are not public, but there are public functions (not shown here) that give read access.
#![allow(unused)]
fn main() {
struct Presets { ... }
impl Presets {
    pub fn new() -> Presets {
    }
    pub fn names(&self) -> &[&str] {
    }
    pub fn len(&self) -> usize {
    }
    pub fn get(&self, i: usize) -> &Preset {
    }
}
}
The struct Presets gives access to all presets. Function names gives their names for use in the user interface. len gives the number of presets and get gets a reference to a preset, given a (zero based) index.
Changes to the main window
We will use a modal window (preset_window) to present the choice of presets. The main window gets a button that shows that window.
#![allow(unused)]
fn main() {
    let preset_btn = Button::builder()
        .label("Choose Preset")
        .margin_start(15)
        .build();

    first_row.append(&preset_btn);

    preset_btn.connect_clicked(clone!(@strong preset_window =>
        move |_btn| preset_window.present();));
}
We use a new widget, Button. We put a label on the button and place it in the top row. We attach a handler to the 'clicked' signal of the button. This function presents the preset window to the user.
The preset window
The preset window makes it possible to select a preset. It communicates this choice through the state.
#![allow(unused)]
fn main() {
State {
    ...
    preset: Option<u8>,
}
}
If a preset was selected, it will be put in the field preset. This field will be None otherwise. We also implement a getter and setter (not shown).
#![allow(unused)]
fn main() {
    let presets = Presets::new();
    let preset_window = build_preset_window(&state, &presets);
    preset_window.set_transient_for(Some(&window));
    preset_window.connect_hide(
        clone!(@strong state, @weak zoom_adj, @weak iter_adj, @weak cx_value, @weak cy_value =>
            move|_w| preset_ready(&state, &cx_value, &cy_value, &zoom_adj, &iter_adj, &presets)),
    );
}
When we build the user interface, we call a function to build the preset window. This function takes a struct with all presets. We make the (modal) preset window transient for the main window. This means that it will be placed on top of that window. We attach a handler to the 'hide' signal of the window.
fn preset_ready(
state: &Rc<RefCell<State>>,
cx_value: >k::Entry,
cy_value: >k::Entry,
zoom_adj: &Adjustment,
iter_adj: &Adjustment,
presets: &Presets,
) {
let preset = state.borrow_mut().take_preset();
if let Some(preset) = preset {
let preset = presets.get(preset as usize);
cx_value.buffer().set_text(preset.cx().to_string());
cy_value.buffer().set_text(preset.cy().to_string());
zoom_adj.set_value(preset.zoom());
iter_adj.set_value(preset.iter_depth());
}
}
The preset_ready handler function takes the preset index from the state, leaving a None in place. If a preset index was set, the corresponding user interface widgets are set with the appropriate values. This will make sure that the mandelbrot figure is redrawn, through the handlers of those widgets.
Now let's focus on building the preset window.
fn build_preset_window(state: &Rc<RefCell<State>>, presets: &Presets) -> Window {
    let preset_view = ... // see below
    let cancel_btn = Button::builder().label("Cancel").build();
    let ok_btn = Button::builder().label("Apply").margin_start(10).build();
    let ready_box = gtk::Box::builder()
        .orientation(gtk::Orientation::Horizontal)
        .margin_top(30)
        .margin_start(20)
        .margin_bottom(20)
        .margin_end(20)
        .build();
    ready_box.append(&cancel_btn);
    ready_box.append(&ok_btn);
    let content_box = gtk::Box::builder()
        .orientation(gtk::Orientation::Vertical)
        .build();
    content_box.append(&preset_view);
    content_box.append(&ready_box);
We explain the creation of the list of presets later. For the rest, we define two buttons here. The user can press the 'cancel' button if he doesn't want to set a preset after all. Otherwise, he can press 'apply'. There are two boxes to line things up the way we want.
#![allow(unused)]
fn main() {
   let win = Window::builder()
       .title("Presets")
       .modal(true)
       .resizable(false)
       .deletable(false)
       .hide_on_close(true)
       .child(&content_box)
       .build();

   win
}
}
Next we look at the window. We give it a title and make it modal. It is not resizable andwe don't want a delete decoration. When we close it, we want to hide it, not delete it. And it should have the content_box as a child.
#![allow(unused)]
fn main() {
    let preset_list= SingleSelection::new(Some(StringList::new(presets.names())));
    let factory = SignalListItemFactory::new();
    factory.connect_setup(preset_setup);
    factory.connect_bind(preset_bind);
    let preset_view = ListView::builder()
        .model(&preset_list.clone())
        .factory(&factory)
        .margin_top(20)
        .margin_start(20)
        .margin_end(20)
        .build();
}
Now we get to the list view. We could have used a drop box here, as we did with the color schemes, but in this way we learn something new.
A ListView is a widget to show all kinds of lists, possibly very long. Unfortunately that means that there is more to take care of than in a DropBox.
A ListView takes a SelectionModel and a ListItemFactory. The first is a list with selection capabilities added. In our case, we use the predefined StringList class and wrap it in the SingleSelection class. We initialize the StringList with the names of the presets.
The factory creates the rows of the ListView. Here, we use the predefined SignalListItemFactory. This factory should respond to signals that are sent when the ListView wants something from the factory. Here we connect to the 'setup' and 'bind' signal. We discuss them below, where we have a look at the handler functions.
#![allow(unused)]
fn main() {
    cancel_btn.connect_clicked(clone!(@weak win, @strong state => move |_| {
       state.borrow_mut().set_preset(None);
       win.set_visible(false);
   }));
   ok_btn.connect_clicked(clone!(@weak win, @strong state => move |_| {
       let sel = preset_list.selected();
       state.borrow_mut().set_preset(Some(sel as u8));
       win.set_visible(false);
   }));
}
When the cancel button is pressed, we store None as preset value in the state.
When the apply button is pressed, we ask which element from the presets list is selected and store that value in the state. In both cases we hide the preset window.
#![allow(unused)]
fn main() {
fn preset_setup(_fac: &SignalListItemFactory, item: &ListItem) {
   item.set_child(Some(&Label::new(None)));
}

fn preset_bind(_fac: &SignalListItemFactory, item: &ListItem) {
   if let Some(widget) = item.child() {
       if let Some(obj) = item.item() {
           if let Ok(str) = obj.downcast::<StringObject>() {
               if let Ok(label) = widget.downcast::<Label>() {
                   label.set_text(&str.string());
               }
           }
       }
   }
}
}
The function preset_setup handles the 'setup' signal. This signal occurs when the listview needs to obtain another row widget. We should call the the function set_child on the ListItemthat is passed as argument. In our case, we add a label, which is all that we show in a row.
The function preset_bind handles the bind signal. This signal occurs when a row needs to be attached to the data of one item of the model. In our case, the rows contain a label and the model items contain a string, which we set as the text of the label. The biggest part of the code is making sure that the option values are not None and that the object and widget can be cast to the type we expect them to be (StringObject and Label).
Having two stages for filling rows seems needlessly complicated. But this caters for cases where you have very large models of which you see only a few rows. The rows can be reused when other items our shown, by binding them to other items. There are two other signals: 'unbind' is the opposite of 'bind' and 'teardown' the opposite of 'setup'. We don't need to act on those signals.
Our Own Image
Strangely enough, in a tutorial about user interface building, nothing visible will change in this chapter. And neither will it in the coming chapters. Instead, we will focus on what funcions gtk supplies that help us developing a more responsive interface. And what limitations it has. You can find the code of this stage in branch 6-vec-image.
Currently, when the mandelbrot picture is computed, the user interface freezes. Try the Flamenco preset, maximize the window and try to change something in the user interface and you will see what I mean. In the next stage, we will use a separate thread to compute the image. That means that we will have to send the image from one thread to another. Now, recall that we used an ImageSurface from cairo to represent the images. Unfortunately, if we at the Auto Trait Implementation section of its documentation, we see !Send. That means, we cannot send it between threads! This is not typical for that class, but is the rule for gtk classes. We read in the glib documentation:
Each class and interface has a corresponding smart pointer struct representing an instance of that type (e.g. Object for GObject or gtk::Widget for GtkWidget). They are reference counted and feature interior mutability similarly to Rust’s Rc<RefCell
> idiom.
And just as Rc is not Send, so are the classes in glib, gtk and the other crates of the GNOME stack for rust.
In this stage we will develop our own image class, such that we will be able to send image data from one thread to another in the next stage.
The class ImageSurface that we use has another constructor function:
#![allow(unused)]
fn main() {
pub unsafe fn create_for_data_unsafe(
    data: *mut u8,
    format: Format,
    width: i32,
    height: i32,
    stride: i32
) -> Result<ImageSurface, Error>
}
The documentation says that it creates an image surface for the provided pixel data.
- The pointer data is the beginning of the underlying slice, and at least width * stride succeeding bytes should be allocated.
- data must live longer than any reference to the returned surface.
- You have to free data by yourself.
Because the function is unsafe, there is every reason to follow these rules. So, let's try to do that. You can find this code in file image.rs.
#![allow(unused)]
fn main() {
pub struct Image {
    _data: Vec<u8>,
    surface: ImageSurface,
}

impl Image {
    pub fn new(mut data: Vec<u8>, format: Format, width: i32, height: i32, stride: i32) -> Image {
        assert!(data.len() >= height as usize * stride as usize);
        let surface;
        unsafe {
            surface = ImageSurface::create_for_data_unsafe(
                data.as_mut_ptr(),
                format,
                width,
                height,
                stride,
            )
            .unwrap();
        }
        Image {
            _data: data,
            surface,
        }
    }
    pub fn surface(&self) -> &ImageSurface {
        &self.surface
    }
}
}
We store the Vec<u8> with the data next to the ImageSurface. The only way to access the image surface is through the function surface, which gives a reference to it. The lifetime of such a reference can be no longer than the lifetime of the corresponding Image struct, so we seem to be good with rule 2. Rule 3 is no problem either, as the Vec will remove the data when the Image is removed. Rule 1 is kind of dealt with with the assertion. Kind of, because we use height times stride in the assertion instead of width times stride in the rule. That is, because I think the rule is wrong.
We use an underscore before the data field, because the rust compiler thinks that we don't use it and would emit a warning otherwise:
field
datais never read
If we would run the program without the next addition, it would show the image, but at the first change there would be a segmentation error. Ouch! What's happening here? We're not programming in C, are we? And yes, we used unsafe code, but didn't we follow the rules so that we should be OK?
What bites us here is the very poor documentation of the cairo crate, I think. Actually, it took me days to find out what could be done about this error. Finally I stumbled upon the documentation of the corresponding C function cairo_image_surface_create_for_data, which says:
The output buffer must be kept around until the cairo_surface_t is destroyed or cairo_surface_finish() is called on the surface. So, let's add the following:
#![allow(unused)]
fn main() {
impl Drop for Image {
    fn drop(&mut self) {
        self.surface.finish();
    }
}
}
So, we call the finish function on the surface just before the Image is destroyed. That does the trick. And to prove my claim about the poor documentation of this function, I will reproduce it here:
Yes, that was it. As we say in Dutch: "Zero, nada, noppes". Hopefully this tutorial will get outdated soon in this respect.
Creating and Using the Image Data
We make are mandelbrot image in the function make_mandel_image. We want to return data that we could move between threads. The class Image that we just defined is not a candidate, because it contains an ImageSurface which is not Send. But a Vec<u8>, which we can use to construct an Image, can be moved.
So we return an optional tuple with the Vec<u8> with the image data as first part and the stride as second part.
#![allow(unused)]
fn main() {
pub fn make_mandel_image(
    mapping: &Mapping,
    col_producer: &Box<dyn Coloring>,
) -> Option<(Vec<u8>, i32)> {
    if !mapping.is_valid() {
        return None;
    }
    match IMG_FMT.stride_for_width(mapping.win_width as u32) {
        Err(_) => None,
        Ok(stride) => {
            let h = mapping.win_height as usize;
            let ustride = stride as usize;
            let mut surface: Vec<u8> = vec![0; h * ustride];
            fill_mandel_image(surface.as_mut(), ustride, mapping, col_producer);
            Some((surface, stride))
        }
    }
}
}
We find the stride with the stride_for_width function which is defined for the cairo Format class. We create a vec of the appropriate size and call fill_mandel image to fill it. That function took a mutable slice already.
In file gui.rs we use the image. We adapt the state and make the img field have the type Option<Image>. In mandel_draw we use img.surface() as first parameter of set_source_surface.
The biggest change is in
#![allow(unused)]
fn main() {
fn recompute_image(state: &mut State) {
    let coloring = state.color_info.scheme(state.col_idx);
    if let Some((img_vec, stride)) = make_mandel_image(&state.mapping, coloring) {
        let img = Image::new(
            img_vec,
            IMG_FMT,
            state.mapping.win_width as i32,
            state.mapping.win_height as i32,
            stride,
        );
        state.img = Some(img);
        if let Some(canvas) = state.canvas.upgrade() {
            canvas.queue_draw();
        }
    }
}
}
The call of make_mandel_image returns a Vec which we use to create an Image.
We put that image in the state.
That was it. I encourage you to play with the code now. Uncomment the finish call and see it crash. Or move the finish call inside the new function and see what happens. After that, we are ready for really using the freshly developed class in the next chapter.
Stop Freezing
In this stage we will make the user interface more responsive by computing the mandelbrot image on a separate thread. The user interface thread and the computation thread communicate by means of messages.
You can find the code of this stage in branch 7-responsive.
The Messages
The messages are derived from the arguments and result of the make_mandel_image function.
#![allow(unused)]
fn main() {
pub struct MandelReq {
    mapping: Mapping,
    coloring: Box<dyn Coloring>,
}
}
The message we send as request to the computation thread, contains a mapping and a coloring. Of course, we don't pass references in a message, as we did in the function call. This means we have to adapt some things in Coloring.
#![allow(unused)]
fn main() {
pub struct MandelReply {
    data: Vec<u8>,
    width: i32,
    height: i32,
    stride: i32,
}
}
The message we send as reply contains the Vec<u8> with image data and the stride, just like the return value of the function. We also provide the width and height of the picture. The receiver of the message needs this information.
The fields of the messages are private, but because we define them in lib.rs and only use them in submodules, that is no limitation.
The Channels
We use the crate 'async-channel' for communicating. This library allows us to use channels both in a synchronous and an asynchronous context. We will see below why we need that.
#![allow(unused)]
fn main() {
    let (req_sender, req_receiver) = async_channel::unbounded();
    let (reply_sender, reply_receiver) = async_channel::bounded(1);
}
We have an unbounded channel for requests, because we don't want to stop the user interface thread, no matter how many requests it sends. The reply channel is bounded. It doesn't make hurt to pause the computation thread when the user interface thread has not yet handled the previous message.
The function recompute_image, which called make_mandel_image, will be split in two parts. The first part, until the call, will send the request and keep the name recompute_image. The second part, which dealt with the result, will now deal with the reply in the new function handle_new_image.
Sending the Request
#![allow(unused)]
fn main() {
struct State {
    ...
    req_sender: Sender<MandelReq>,
}

    let state = Rc::new(RefCell::new(State::new(req_sender)));
}
In the state we store the request sender. The function new takes a parameter now for this purpose.
#![allow(unused)]
fn main() {
    fn recompute_image(&mut self) {
        let coloring = self.color_info.scheme(self.col_idx).clone();
        let request = MandelReq {
            mapping: self.mapping.clone(),
            coloring,
        };
        let _ = self.req_sender.send_blocking(request);
    }
}
The function recompute_image in State now just sends a request to the computation thread.
We clone the coloring and mapping and store it in a message. We use the function send_blocking to send the message. This function can be used in the synchronous context we have here. It blocks until the message is sent, but because we have an unbounded queue, that won't take long.
Receiving the Reply
The user interface thread has to receive the replies and act upon them.
#![allow(unused)]
fn main() {
    glib::spawn_future_local(new_image_handler(reply_receiver, state));

async fn new_image_handler(reply_receiver: Receiver<MandelReply>, state: Rc<RefCell<State>>) {
    while let Ok(reply) = reply_receiver.recv().await {
        let img = Image::new(reply.data, IMG_FMT, reply.width, reply.height, reply.stride);
        state.borrow_mut().set_img(img);
    }
}
}
Glib offers the function spawn_future_local which makes it possible to run code concurrently in the user interface thread. It takes a future, which is what we get from the async function new_image_handler. This is the only place in the code where the keyword async occurs, so we'll spend a few words on it.
The function new_image_handler receives messages in a loop and hands them over to be processed. Because it runs in an asynchonous context, it uses the the function recv. This function returns a future, which we await. That means, that if there is no message to receive, the function will suspend and the thread (the user interface thread) will move on doing other things. It will be notified when the function has something to receive, so that the function can be resumed. This kind of cooperative concurrency makes it possible that a single thread both waits for messages and handles user interaction.
#![allow(unused)]
fn main() {
fn handle_new_image(reply: MandelReply, state: &mut State) {
    state.img = Some(Image::new(
        reply.data,
        IMG_FMT,
        reply.width,
        reply.height,
        reply.stride,
    ));
    if let Some(canvas) = state.canvas.upgrade() {
        canvas.queue_draw();
    }
}
}
The function handle_new_image handles one reply. It constructs the image, puts it in the state and notifies the canvas that it should redraw. Notice that it is vital that this function runs on the user interface threads, otherwise all those operations would be illegal.
The Computation Thread
We want the code that computes the Mandelbrot images to run on a separate thread.
#![allow(unused)]
fn main() {
    gio::spawn_blocking(move || mandel_producer(req_receiver, reply_sender));
}
Gio has a thread pool that we can use to for this purpose. We hand it a closure that captures the request receiver and reply sender.
#![allow(unused)]
fn main() {
pub fn mandel_producer(
    req_receiver: async_channel::Receiver<MandelReq>,
    reply_sender: async_channel::Sender<MandelReply>,
) {
    loop {
        let mut request;
        match req_receiver.recv_blocking() {
            Err(_) => break,
            Ok(new_request) => {
                request = new_request;
            }
        }
        request = last_request(request, &req_receiver);
        if let Some((data, stride)) = make_mandel_image(
                    &request.mapping, &request.coloring) {
            let _ = reply_sender.send_blocking(MandelReply {
                data,
                width: request.mapping.win_width as i32,
                height: request.mapping.win_height as i32,
                stride,
            });
        }
    }
}
}
The function mandel_producer listens in a loop for requests. We use recv_blocking, because we are in a synchonous context and actually need to block if there is no message. If an error occurs, we leave the loop. This should only occur if the channel was closed by the sender.
There may be several requests waiting. If there are, we throw away all but the last and process that one.
Next, we compute the image with the help of make_mandel_image. We construct a reply message with the data returned and the width and height that are available in the request. We use send_blocking, that may indeed block us, because of the bounded reply channel. But as soon as the user interface thread catches up, we will proceed. If something goes wrong when making the image, we will just not send anything.
#![allow(unused)]
fn main() {
fn last_request(
    mut request: MandelReq,
    req_receiver: &async_channel::Receiver<MandelReq>,
) -> MandelReq {
    loop {
        match req_receiver.try_recv() {
            Ok(new_request) => {
                request = new_request;
            }
            Err(_) => return request,
        }
    }
}
}
The function last_request will replace the input request by the last request in the queue. In a loop we call try_recv. If there is no message in the queue, this will return an Err and we will return the request we have. Otherwise we replace the request and continue to look for more messages.
Changes to Coloring
In the function recompute_image we cloned a Box<dyn Coloring> and then sent it over a channel. We need to do something to make this possible.
#![allow(unused)]
fn main() {
pub trait Coloring: DynClone + Sync + Send {
  ...
}

dyn_clone::clone_trait_object!(Coloring);
}
The crate dyn-clone supplies everything that we need. And it contains all explanations that you need, so please follow the link if you want to know more.
Be Quick
In this stage we will make the application quicker. We apply two changes:
- issue fewer image recomputations
- use parallel computation
There is nothing gtk-related in this chapter, but perhaps it is nice to see two techniques for making things faster. The code of this stage can be found on branch 8-parallel
Fewer recomputations
When we select a preset or when we click on the picture, several widgets are changed and each of those changes invoke a recompute. Now, there is no better optimization than avoiding unnecessary work, so let's do that.
In module state we introduce the function postpone_redraw which disables recompute_image requests. The function returns an object. When that object is dropped, recompute_image is reenabled and called.
#![allow(unused)]
fn main() {
fn on_clicked(state: &Rc<RefCell<State>>, ...) {
    gesture.set_state(gtk::EventSequenceState::Claimed);
    let _late_redraw = postpone_redraw(state);
    let (new_cx, new_cy) = state.borrow().win_to_mandel(wx, wy);
    cx_value.set_text(&new_cx.to_string());
    cy_value.set_text(&new_cy.to_string());
}
}
Here is how we use this in the handler for the click signal. After the last line of the function _late_redraw is dropped and only then a recompute of the image is requested.
#![allow(unused)]
fn main() {
fn preset_ready(state: &Rc<RefCell<State>>, ...) {
    let preset = state.borrow_mut().preset.take();
    let _late_redraw = postpone_redraw(state);
    if let Some(preset) = preset {
        ...
    }
}
}
We use it in the same way in the preset_ready handler function.
#![allow(unused)]
fn main() {
#[must_use = "if unused would redraw without postponing anything"]
pub fn postpone_redraw(state: &Rc<RefCell<State>>) -> PostponedRedraw {
    state.borrow_mut().block = true;
    PostponedRedraw {
        state: state.clone(),
    }
}

#[clippy::has_significant_drop]
pub struct PostponedRedraw {
    state: Rc<RefCell<State>>,
}

impl Drop for PostponedRedraw {
    fn drop(&mut self) {
        let mut state = self.state.borrow_mut();
        state.block = false;
        state.recompute_image();
    }
}

}
The implementation is simple. We add a field block: bool to the state, which we initialize to false. The function recompute_image returns immediately if this field is true. The function postpone_redraw sets it to true and returns a PostponedRedraw object. The drop function of that object sets block to false and redraws.
Parallel computation
The computation time for the Mandelbrot image depends on the settings. When we have a large window and look at a region where we have many iterations, it can take a few seconds. We do the same kind of computation for every pixel, so there is ample of room to do things in parallel. Depending on the number of cores of the hardware, this can give a nice speedup.
#![allow(unused)]
fn main() {
use scoped_threadpool::Pool;

pub fn mandel_producer(
    req_receiver: async_channel::Receiver<MandelReq>,
    reply_sender: async_channel::Sender<MandelReply>,
) {
    let par_count: usize;
    match thread::available_parallelism() {
        Ok(pc) => par_count = pc.into(),
        Err(_) => par_count = 8,
    }
    let mut pool = Pool::new(par_count as u32);
    ...
        make_mandel_image(&request.mapping, &request.coloring, &mut pool)
    ...
}
}
We use the crate scoped-threadpool as a threadpool. We will explain later why we need the specific features of this (not so very popular) crate. Before we start the loop in mandel_producer, we ask the standard thread library what would be a good amount of parallelism and create a thread pool of that size. In the actual code you can see that we treat the case where par_count is less than 2 specially. We don't show that here. We pass that pool as parameter to every make_mandel_image call. That function passes it through to the new function fill_mandel_image_parallel.
The job of this function is to divide the work over the threads in the threadpool. Because the function is large, we will show it in two parts.
#![allow(unused)]
fn main() {
fn fill_mandel_image_parallel(
    pool: &mut Pool,
    data: &mut [u8],
    col_producer: &Box<dyn Coloring>,
    stride: usize,
    mapping: &Mapping,
) -> bool {
    let converter = WinToMandel::from_mapping(mapping);
    let w = mapping.win_width;
    let h = mapping.win_height;
    let max = mapping.iteration_depth;
    let par_count = pool.thread_count() as usize;
    let mut splits = compute_splits(h, par_count);
    let mut end = h;
    let mut statuses = vec![true; par_count];
}
The first part of the function is the declaration of the parameters and then a section where we prepare some data. We need to fill data, which has h rows of w pixels ( = stride bytes). To divide those rows as evenly as possible over par_count threads, we compute at what rows we should split with the function compute_splits. It returns a vector of par_count elements, starting with 0 and non decreasing. We create a vector of bools to record the success or failure of each thread.
#![allow(unused)]
fn main() {
    pool.scoped(|scope| {
        let mut rest_of_data = data;
        let mut rest_of_statuses = &mut statuses[..];
        while let Some(s) = splits.pop() {
            let (cur_status, cur_data);
            (rest_of_data, cur_data) = rest_of_data.split_at_mut(ustride * s);
            (cur_status, rest_of_statuses) = rest_of_statuses.split_at_mut(1);
            let converter_ref = &converter;
            scope.execute(move || {
                cur_status[0] = fill_mandel_image_partial(
                    cur_data,
                    col_producer,
                    converter_ref,
                    w,
                    s,
                    end,
                    max,
                    ustride,
                );
            });
            end = s;
        }
    });
    statuses.into_iter().fold(true, |a, b| a && b)
}
}
The pool.scoped fuction calls the closure that we pass it and then joins all the threads that were created with scope.execute. This guarantee of joining is what makes borrowing of statuses and data possible. Otherwise, it would be impossible to guarantee that those lifetimes were limited.
You can read more about scoped threads in the documentation of crate std.
The variable rest_of_data contains the data that is not yet filled and rest_of_statuses the statuses that are not yet set. Before the while loop, rest_of_data contains all data and rest_of statuses all statuses. After it both will be empty slices.
The slice function split_at_mut divides a mutable slice in two mutable slices. That is what we use here in a loop. We will work with cur_data and cur_status and will leave the other part in rest_of_data and rest_of_statuses respectively, to be handled in later rounds. The function scope.execute starts a new thread. This thread fills rows [s..end), by calling fill_mandel_image_partial.
There will be par_count rounds of the while loop. That rest_of_data becomes empty follows from the fact that the last pop yields 0. For rest_of_statuses from the fact that it has par_count elements, and we remove one status in every round. So indeed both slices will become empty.
After the scoped call we check if all threads finished succesfully and return this value.
#![allow(unused)]
fn main() {
fn compute_splits(h: usize, par_count: usize) -> Vec<usize> {
    let h_step = h / par_count;
    let h_extra = h % par_count;
    let mut splits = Vec::with_capacity(par_count);
    let mut split = 0;
    for _i in 0..h_extra {
        splits.push(split);
        split += h_step + 1;
    }
    for _i in h_extra..par_count {
        splits.push(split);
        split += h_step;
    }
    splits
}
}
You can check yourself that the above function delivers the splits we want. For instance, compute_splits(7,3) would yield [0,3,5]. That would give slices 5..7, 3..5 and 0..3. After the second for loop, the value of split will be h.
#![allow(unused)]
fn main() {
fn fill_mandel_image_partial(
    data: &mut [u8],
    col_producer: &Box<dyn Coloring>,
    converter: &WinToMandel,
    w: usize,
    h_start: usize,
    h_end: usize,
    max: u32,
    ustride: usize,
) -> bool {
    {
        let mut ok = true;
        for dy in 0..(h_end - h_start) {
            let y = converter.cvt_y(h_start + dy);
            let line = &mut data[dy * ustride..(dy + 1) * ustride];
            let mut iter = line.iter_mut();
            for wx in 0..w {
                let x = converter.cvt_x(wx);
                let mv = mandel_value(x, y, max);
                let bytes = col_producer.get_color(mv, max).to_ne_bytes();
                for i in 0..bytes.len() {
                    if let Some(v) = iter.next() {
                        *v = bytes[i];
                    } else {
                        ok = false;
                    }
                }
            }
        }
        return ok;
    }
}
}
Function fill_mandel_image_partial fills rows h_start till (and not including) h_end with the right pixel values. The code is a reasonably simple double loop over rows and columns. It converts the window coordinates to mandelbrot coordinates, computes the mandelbrot value, converts that to a color and places the bytes of the color in the right spot in the array.
Contributions
This tutorial was written by Geert-Jan Giezeman